尼玛的cisco!640-802题库笔记(持续更新)
分类:思科技术日期:2011-07-08 - 21:05:16评论:5条作者:老谢

一天至少理解5、60题吧!!好吧,今天开始开工了!!!
ps:本文除原英文题外,所有汉字部分,均为老谢原创,转载请注明!
本人英语很垃圾,只能解释大意,较真的朋友就完全没必要了
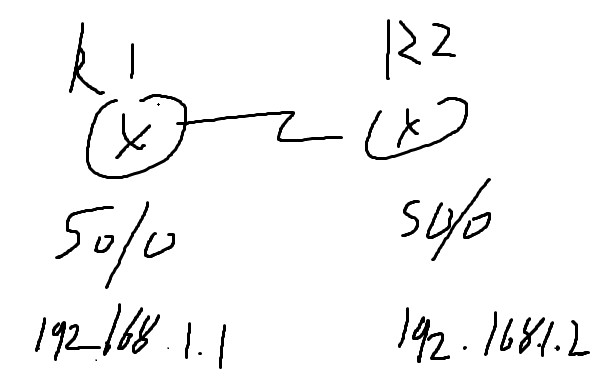
1. Refer to the exhibit. What could be possible causes for the "Serial0/0 is down" interface status? (Choose two.)
大意:如果所示s0/0的端口状态,可能的原因是什么

A. A Layer 1 problem exists. 第一层有问题,嗯。。。正确
B. The bandwidth is set too low. 带宽设置错误?坑爹啊!
C. A protocol mismatch exists. 协议不匹配?肯定不对。。
D. An incorrect cable is being used. 使用不匹配的线缆类型,对的。。
E. There is an incorrect IP address on the Serial 0/0 interface. IP地址?尼玛show int关你IP什么事
本题答案:AD
2. Before installing a new, upgraded version of the IOS, what should be checked on the router, and which
command should be used to gather this information? (Choose two.)
大意:升级IOS,应该检查什么
A. the amount of available ROM 检查ROM,那flash不检查了?
B. the amount of available flash and RAM memory ROM、flash都有了,正确
C. the version of the bootstrap software present on the router 看bootstrap版本?有必要么
D. show version 看目前IOS的版本,有必要,正确
E. show processes 管你进程什么事。
F. show running-config 看你妹的运行配置。。
本题答案:BD
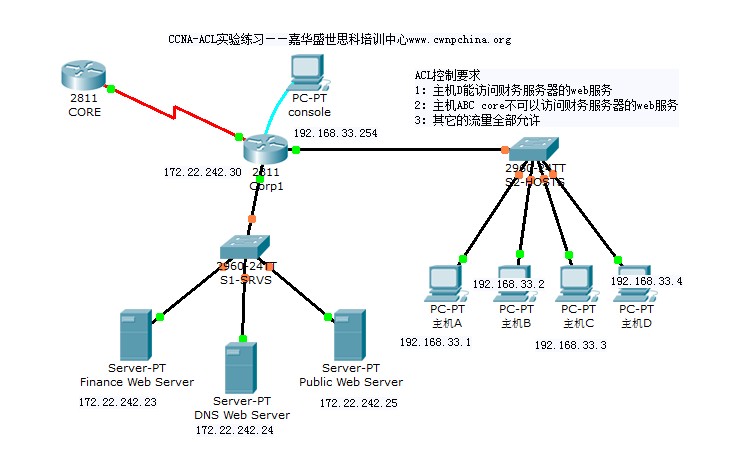
3. Refer to the exhibit. Which two statements are true about interVLAN routing in the topology that is shown in the exhibit? (Choose two.)
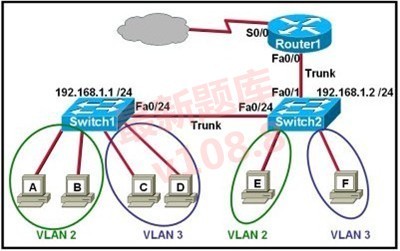
大意:看拓扑,哪两种说法正确在这个vlan间路由
A. Host E and host F use the same IP gateway address. E去F用相同的网关,肯定不对了
B. Router1 and Switch2 should be connected via a crossover cable. 路由连接交换机用交叉线?错了!
C. Router1 will not play a role in communications between host A and host D. router1在A和D通信不起到任何作用?怎么可能呢。。
D. The FastEthernet 0/0 interface on Router1 must be configured with subinterfaces. 单臂路由,配置子接口,正确
E. Router1 needs more LAN interfaces to accommodate the VLANs that are shown in the exhibit. route1需要更多lan来连接如图所示的vlan们,你们家接口不要钱吧!!配置子接口就行了!
F. The FastEthernet 0/0 interface on Router1 and Switch2 trunk ports must be configured using the same encapsulation type. 使用相同的封装类型,正确
本题答案:EF
4. Refer to the exhibit. Which two statements are true about the loopback address that is configured on RouterB? (Choose two.)

大意:选择两种关于loopback口的正确说法
A. It ensures that data will be forwarded by RouterB. routerB为什么要转发数据。。。
B. It provides stability for the OSPF process on RouterB. 可以稳定OSPF进程,嗯,正确
C. It specifies that the router ID for RouterB should be 10.0.0.1. 嗯,routerB的路由ID是loopback口
D.It decreases the metric for routes that are advertised from RouterB. 可以改变度量值?怎么可能。。
E. It indicates that RouterB should be elected the DR for the LAN. routerB的路由ID最大?明显不是,怎么可能当选DR呢!!
答案:BC
5. A network administrator is explaining VTP configuration to a new technician. What should the network
administrator tell the new technician about VTP configuration? (Choose three.)
大意:新来的一个网管,告诉新网管VTP的配置
A switch in the VTP client mode cannot update its local VLAN database.
client不能更新自己的vlan,正确
B. A trunk link must be configured between the switches to forward VTP updates.
trunk链路必须转发更新VTP的信息,正确
A switch in the VTP server mode can update a switch in the VTP transparent mode.
尼玛人家都透明模式了,你server还更新你妹啊!不对!
D. A switch in the VTP transparent mode will forward updates that it receives to other switches.
透明模式可以转发vtp更新,正确,我不学习但是转发,我就是个传话的
E. A switch in the VTP server mode only updates switches in the VTP client mode that have a higher VTP
revision number.
server只能从client学更高版本的VTP??显然不对。。
F. A switch in the VTP server mode will update switches in the VTP client mode regardless of the configured VTP domain membership.
不管配没配vtp域,server都从client更新,又错了。。
答案:ABD
6. Which two locations can be configured as a source for the IOS image in the boot system command?
(Choose two.)
大意:可以启动IOS的位置
A. RAM
B. NVRAM
C. flash memory
D. HTTP server
E. TFTP server
F. Telnet
这题都要翻译的话。。没话说了
答案:CE
7. What are two reasons a network administrator would use CDP? (Choose two.)
大意:网管使用CDP的原因是什么
A. to verify the type of cable interconnecting two devices
验证线缆类型,CDP没这功能
B. to determine the status of network services on a remote deviceC. to obtain VLAN information from directly connected switches
看到network就不用看了,CDP只是本地生效
C. to obtain VLAN information from directly connected switches
CDP不能看到VLAN信息,就是这样
D. to verify Layer 2 connectivity between two devices when Layer 3 fails
可以验证2、3之间的设备,正确
E. to obtain the IP address of a connected device in order to telnet to the device
可以看到连接和telnet的设备,嗯,正确
F. to determine the status of the routing protocols between directly connected routers
可以看到路由协议的情况,这好像是show protocol的功能
答案:DE
8. Refer to the exhibit. Both switches are using a default configuration. Which two destination addresses will host 4 use to send data to host 1? (Choose two.)

A. the IP address of host 1
B. the IP address of host 4
C. the MAC address of host 1
D. the MAC address of host 4
E. the MAC address of the Fa0/0 interface of the R1 router
F. the MAC address of the Fa0/1 interface of the R1 router
大意:4和1都用默认网关,将用什么地址把数据发出去,这个简单的不用讲了
答案:AF
9. Refer to the exhibit. The router has been configured with these commands:
hostname Gateway
interface FastEthernet 0/0
ip address 198.133.219.14 255.255.255.248
no shutdown
interface FastEthernet 0/1
ip address 192.168.10.254 255.255.255.0
no shutdown
interface Serial 0/0
ip address 64.100.0.2 255.255.255.252
no shutdown
ip route 0.0.0.0 0.0.0.0 64.100.0.1
What are the two results of this configuration? (Choose two.)
大意:如图所示,这个路由的配置如下

A. The default route should have a next hop address of 64.100.0.3. 没任何一个地方说明有0.3这个网络
B. Hosts on the LAN that is connected to FastEthernet 0/1 are using public IP addressing. 自己去看配置,FA0/1是一个私网地址
C. The address of the subnet segment with the WWW server will support seven more servers. 这个子网支持超过7个服务器,/29 这样的话主机位就是3,2的3次幂=8,再减掉2=6,明显不对了。。。
D. The addressing scheme allows users on the Internet to access the WWW server. www服务器允许公网直接访问,嗯。。正确,它使用公网IP
E. Hosts on the LAN that is connected to FastEthernet 0/1 will not be able to access the Internet without
address translation. 在没有地址转换的情况下,fa0/1不能访问互联网,正确
答案:ED
10. A company is installing IP phones. The phones and office computers connect to the same device. To ensure maximum throughput for the phone data, the company needs to make sure that the phone traffic is on a different network from that of the office computer data traffic. What is the best network device to which to directly connect the phones and computers, and what technology should be implemented on this device?
(Choose two.)
大意:公司装IP电话,为了确保不同的流量,应该用什么设备和什么技术
A.hub
B. router
C. switch
D. STP
E. subinterfaces
F. VLAN
简单的题目我也就不浪费时间说了
答案:CF
11. What are two benefits of using VTP in a switching environment? (Choose two.)
大意:在交换网络中使用VTP的两个好处
A. It allows switches to read frame tags. 允许读取帧标签,不正确
B. It allows ports to be assigned to VLANs automatically. 端口被自动分配到对应vlan,肯定不对,要是正确就乱套了
C. It maintains VLAN consistency across a switched network. 保持整个网络的VLAN一致性,正确
D. It allows frames from multiple VLANs to use a single interface. 允许多个vlan使用单一接口,不对
E. It allows VLAN information to be automatically propagated throughout the switching environment. 允许VLAN信息自动传播到网络
答案:CE
12. Which two statements are true about the command ip route 172.16.3.0 255.255.255.0 192.168.2.4?
(Choose two.)
大意:下面哪两种关于这条命令正确的说法
A. It establishes a static route to the 172.16.3.0 network. 建立了3.0的静态路由,正确
B. It establishes a static route to the 192.168.2.0 network. 哪里有2.0这个网络,明显不对
C. It configures the router to send any traffic for an unknown destination to the 172.16.3.0 network. 一条未知的路由将发送到3.0这个网络,不能嘛,这又不是默认路由
D. It configures the router to send any traffic for an unknown destination out the interface with the address
192.168.2.4. 跟上个选项大意差不多
E. It uses the default administrative distance. 使用默认管理距离 正确
F. It is a route that would be used last if other routes to the same destination exist. 存在其他路由的时候,使用其他路由条目,不可能吧,默认路由的管理距离最高
答案:AE
13. What are two advantages of Layer 2 Ethernet switches over hubs? (Choose two.) 交换机比较集线器的两点优势
A. decreasing the number of collision domains 减少冲突域 错误
B. filtering frames based on MAC addresses 基于MAC过滤 正确
C. allowing simultaneous frame transmissions 允许帧同步发送 正确
D. increasing the size of broadcast domains 增加广播域,错误
E. increasing the maximum length of UTP cabling between devices 增加线缆长度?一毛钱关系都没
答案:BC
14. Refer to the exhibit. A network associate needs to configure the switches and router in the graphic so that the hosts in VLAN3 and VLAN4 can communicate with the enterprise server in VLAN2. Which two Ethernet segments would need to be configured as trunk links? (Choose two.)
大意:如图所示,哪两条线路需要配置trunk

A. A
B. B
C. C
D. D
E. E
F. F
答案:很明显是CF
15. Which two values are used by Spanning Tree Protocol to elect a root bridge? (Choose two.) 哪两种情况会当选成根网桥
A. amount of RAM
B. bridge priority
C. IOS version
D. IP address
E. MAC address
F. speed of the links
答案:BF
16. Refer to the exhibit. Assume that the routing protocol referenced in each choice below is configured with its default settings and the given routing protocol is running on all the routers. Which two conditional statements accurately state the path that will be chosen between networks 10.1.0.0 and 10.3.2.0 for the routing protocol mentioned? (Choose two.)
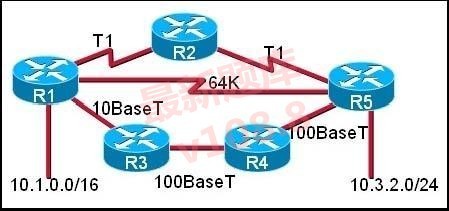
A. If OSPF is the routing protocol, the path will be from R1 to R3 to R4 to R5.
B. If OSPF is the routing protocol, the path will be from R1 to R2 to R5.
C. If OSPF is the routing protocol, the path will be from R1 to R5.
D. If RIPv2 is the routing protocol, the path will be from R1 to R3 to R4 to R5.
E. If RIPv2 is the routing protocol, the path will be from R1 to R5.
其实问的就是两种不同的路由协议,会如何选取最优路径
答案:AE
17. Refer to the exhibit. A network administrator is adding two new hosts to SwitchA. hich three values could be used for the configuration of these hosts? (Choose three.)

大意:在交换机A下面增加了两台主机,将用到什么配置
A. host A IP address: 192.168.1.79
B. host A IP address: 192.168.1.64
C. host A default gateway: 192.168.1.78
D. host B IP address: 192.168.1.128
E. host B default gateway: 192.168.1.129
F. host B IP address: 192.168.1.190
自己算吧
答案:ACF
18. A network administrator changes the configuration register to 0x2142 and reboots the router. What are two results of making this change? (Choose two.)
大意:网管改变了寄存器值为:0X2142,重启路由器后会有什么变化
A. The IOS image will be ignored. 忽略IOS?成仙了么……
B. The router will prompt to enter initial configuration mode.进去配置模式,嗯,正确
C. The router will boot to ROM. 寄存器跟ROM有什么关系。。
D. Any configuration entries in NVRAM will be ignored. 忽略NVRAM,正确
E. The configuration in flash memory will be booted. 跟flash没关系- –
答案:BD
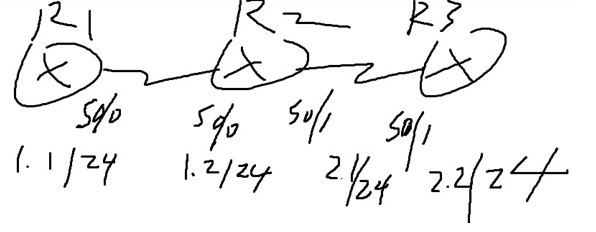
19. Refer to the exhibit. The networks connected to router R2 have been summarized asa 192.168.176.0/21 route and sent to R1. Which two packet destination addresses will R1 forward to R2? Choose two.)
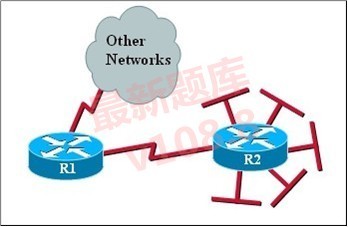
大意:连接到R2的路由汇总了192.168.176.0/21的路由发给R1 哪两个包R1将发给R2
A. 192.168.194.160
B. 192.168.183.41
C. 192.168.159.2
D. 192.168.183.255
E. 192.168.179.4
F. 192.168.184.45
192.168.10110 000.00000000~192.168.10110 111.11111111 176.1~183.254
答案:BE
20. Which three statements are typical characteristics of VLAN arrangements?(Choosethree.)
大意:关于VLAN的三种典型特征
A. A new switch has no VLANs configured. 默认VLAN1,所以错误
B. Connectivity between VLANs requires a Layer 3 device. VLAN间路由需要三层设备,正确
C. VLANs typically decrease the number of collision domains. VLAN减少冲突域,错误
D. Each VLAN uses a separate address space. 每一个VLAN使用单独的地址 正确
E. A switch maintains a separate bridging table for each VLAN. 每个VLAN都有一张表,正确
F. VLANs cannot span multiple switches. VLAN不能传播到其他交换机(用VLAN实现)
答案:BDE
21. Refer to the exhibit. Which three statements are true about how router JAX will choose a path to the 10.1.3.0/24 network when different routing protocols are configured? (Choose three.)
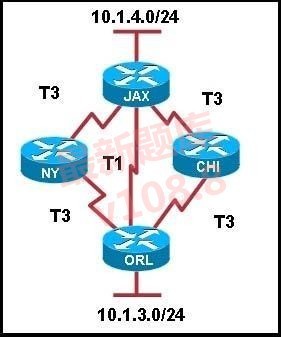
A. By default, if RIPv2 is the routing protocol, only the path JAX-ORL will be installed into the routing table.
B. The equal cost paths JAX-CHI-ORL and JAX-NY-ORL will be installed in the routing table if RIPv2 is the
routing protocol.
C. When EIGRP is the routing protocol, only the path JAX-ORL will be installed in the routing table by
default.
D. When EIGRP is the routing protocol, the equal cost paths JAX-CHI-ORL, and JAX-NY-ORL will be
installed in the routing table by default.
E. With EIGRP and OSPF both running on the network with their default configurations, the EIGRP paths
will be installed in the routing table.
F. The OSPF paths will be installed in the routing table, if EIGRP and OSPF are both running on the
network with their default configurations.
大意:两种路由协议,如何选择路径
答案:ADE


最新评论
zwwooooo:买特斯拉和买iPhone的人群其实相似...
平安家属子痕:一直坚持油车,看你写的心里有...
秦大叔:室内每年能开2万公里电车确实划算 ...
灰常记忆:尊贵的特斯拉车主啊,对了一直对单...
拳废神域界:我的车现在平常跑不了啥,就放假...
大峰:电车起步超级快,我油车反正是跟不上,...
Mr.Chou:电车高速上真120和油车120真的有区...
Mr.Chou:18 19年入手的房子现在死的心都有了...
老何:不至于跌得这么狠吧
Andy烧麦:这些大厂都能提供必要的售后